
Introduction
In this article we will walk you through how to set up Interactive Presentation from the perspective of a teacher.
If you’d like more information on how this tool works, you can check out other articles here:
Interactive Presentation: For Teachers (Active Assignment)
Interactive Presentation: Overview
Interactive Presentation: For Students
Tool In Action
How this article is structured
This article walks you through the steps of a Interactive Presentation activity, following the same flow as the tool itself. It will describe the process of setting up the assignment. This refers to what you can configure before the assignment is published, such as instructions, settings, deadlines, grouping, and grading rules. Students cannot access the activity at this stage. You can still edit some settings after publishing; however, once students start making progress, certain options may be locked to protect their work and data. Wherever this applies, the article will clearly note it.
Note: When you open a published activity, you’ll land on the Active Assignment view by default. To return to the setup view after publishing, click Edit in the upper-left corner of the activity.
You can see the article about the Active Assignment view of this tool here.
Accessibility
We're devoted to making our tools as accessible as possible for all learners - to read more about accessibility in FeedbackFruits tools, check this article: Accessibility: Within FeedbackFruits Tools.
Step 1: Instructions
Interactive Presentation by FeedbackFruits is a tool meant to make presentations more engaging, by encouraging attentiveness and active thinking by requiring students to answer questions, as well as helping teachers keep track of their student's progress/level of understanding.
When you first open the Interactive Presentations module, you are met with the screen below. At the top, you can type in the name of your presentation.
Note: if you access Interactive Presentations through your LMS (such as Blackboard, Canvas, or Brightspace), you can only change the title in the LMS.
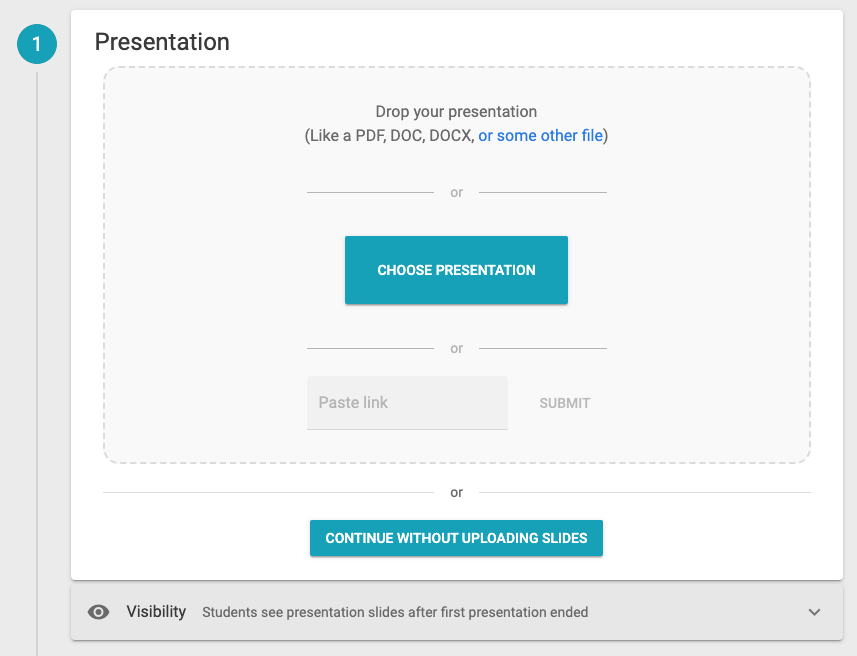 Fig. 1.1: Presentation: Setting up
Note that if you also want to include some instructions or any other message with the task you're setting up, this can be done by scrolling down and clicking on the circular blue + button. Once you click the button, you will see a screen prompting you to select the type of module you want to add, select Instructions.
Once you click on it, it gets added as the first step in the tool set-up screen. Scroll back to the top to type in the instructions.
To set up the interactive presentation, you must first add the slides you will use: these can be added by either dragging-and-dropping the file directly from your computer, clicking Choose Presentation and browsing the file you want to use, or entering the link in the Paste link box, in case the document is stored online.
Note that you can also use the tool to create a presentation that only has question slides (i.e., merely add questions which are presented to your students one after the other, with no need for an actual presentation - a bit like an interactive quiz) by clicking Create Question Slide.
Step 2: Presentation
In Step 2, once the upload is done, you will see a preview of the file you selected - if this doesn't happen, check that the file is not corrupted or that the link is still functional. Note that you can still change the file once you've uploaded it by clicking Update.
Note: if you've already added question slides, you can still change the presentation file. The question slides will stay in the position (i.e, between slides number 3 and 4) as where you placed them in the original file.
Presentation Settings
Click settings to see different options for the visibility of the slides and who can join the interactive presentation.
You get options to Hide parts before/after presentation:
-
Presentation slides, has 4 options: before the presentation (i.e., all slides will be visible before you start the presentation to all students who have joined it); after first presentation ended (i.e., the presentation will become visible after you've shown it in class); after they attend a presentation (i.e., slides become visible once who were in class and joined the presentation); only during presentation (i.e., slides will not be visible before or after, but only during the presentation).
Question Slides and Answers slides has the same 3 options: after first presentation ended (i.e., question slides/answers are visible after class); after they attend a presentation (i.e., only those who joined the presentation get to see questions/answers); only during presentation (before and after) (i.e., questions/answers cannot be seen before or after class has ended, but only while it takes place). See two screenshots above to see the list again.
To summarize:
Before the presentation: All slides will be visible to students who have joined the presentation before it starts.
After the first presentation ends: The slides will become visible once you’ve completed the presentation in class.
After they attend a presentation: Slides will be visible only to students who were in class and joined the presentation.
-
Only during the presentation: Slides will not be visible before or after but will only be accessible during the presentation.
You can also enhance the slide appearance. To make links on slides clickable or allow text to be selected, simply toggle this feature on.
Adding Question Slides
To add interactive questions to your presentation, go back to your presentation and click on Edit Slides, which you will find on the preview of the document.
This will lead you to a new interface, where either Multiple Choice or Open questions can be added before or after each slide of your uploaded presentation. To do this, you simply need to hover with your mouse to the point where you want to add the question, and a blue bubble with a white plus will appear.
Click on it, when it's in the right place, and a little menu prompting you to choose between a Multiple Choice Question and an Open Question will appear.
Adding a multiple choice question
When adding a multiple-choice question, you will see a screen where you can type your question and optionally attach a file, such as an image, by clicking the gray paperclip icon. You can also set a timer to limit the time students have to answer the question.
At the bottom of the menu, you can configure the following options:
Show Question: Decide whether to display this question to the class or keep it hidden.
Show Results: Choose whether to display the students' answers to the entire class.
Show Correct Answer: Determine whether the correct answer will be shown after the question is answered.
Fig. 4.3: Slides: Adding a multiple choice question
Clicking Show More or scrolling down will reveal the answer options. Here, you can choose whether students can select only one correct answer or multiple correct answers by toggling the Allow participants to select multiple choices option (the default is one correct answer per question). You can then add the answer options. By default, the tool provides two answer options, but you can easily add more by clicking Add Answer.
Additionally, you can attach files as answer options (e.g., using images instead of text) by clicking the gray paperclip icons.
Fig. 4.4: Show more
Additional information about the timer and answer options:
To save the timer, enter the desired duration and click the blue bubble with the white checkmark. The timer can also be deleted by clicking the small gray trash can icon next to it, or edited by clicking the pencil icon.
Answer options can similarly be deleted by clicking on the bins. Additionally, if you check an answer as correct by clicking the little square to its left, the "Reveal correct answer" option will automatically be turned on and this answer (or answers) will be displayed as the correct one after the students submit their responses.
Adding an open question
To add an open question, you must follow the same steps as above. You can add it right after the previous question (i.e., you can have several questions in a row) or at any other point in the presentation. For open questions, once again, you have the option to add a timer or an attachment.
Note that you can delete question slides (or the ones from the original presentation) by clicking on the little bins attached to each slide (lower right corner).
After typing your question, you can enter the correct answer, or leave this blank, if it's an opinion question, or if you don't want it to be revealed once students have answered. Note that in order to save time, you have to enter the timer duration and then press the blue bubble with a white check mark.
Following the steps above, you can keep adding questions until you have added all the ones you deem necessary. Note that if you still want to change the settings related to when and how slides are shared with students (i.e., Presentation Settings), you can simply press the left pointing arrow in the top left corner. This will not undo the questions you have already added.
Once you’re done, you can either click Save to return to the main setup page or click Present Live if you wish to start presenting live to your students.
Fig. 6: Present live / Save
Presentation: Live
Once you're ready to present, click on Present Live in the upper right corner.
This will open a screen showing a link for the presentation along with the option to start it. Once you begin, you are live, and students can join the presentation. Students can join by navigating to the Interactive Presentation in their course on the LMS.
Note that the link will only work if you're using the Interactive Presentation tool directly from the FeedbackFruits website; if you’re using it through an LMS like Canvas, Brightspace, or Blackboard, students will need to join from the LMS interface.
As soon as your students join, you will be informed on this screen.
Once your audience has joined, you can start the presentation by clicking Start Presentation.
Fig. 8: Slides while presenting
Please be aware that your students will only view the slides as you make changes to them. This means that they will only see the first slide until you move on to the next one. Additionally, if you switch to full screen mode, you will only be able to see one slide at a time, as is typical for a presentation. This is different from the screenshot above, where you can see all the slides lined up at the bottom.
When you navigate to a question slide, the screen will appear as one of the two options below, based on the type of question you’re asking: (a) an open-ended question or (b) a multiple-choice question.
Fig. 9.1: (A.) Open question
Fig. 9.2: (B.) Multiple choice question
As participants respond, their answers will appear below the question, displayed in blue text.
Fig. 10: Response Update
Once you've received responses from everyone who wants to proceed, click Next at the bottom or move to the next slide to display the results. If you’ve set any correct answers, you can reveal them at this stage.
Fig. 11: Show results: (A.) Open question
Fig. 12: Show results: (B.) Multiple choice question
Fig. 13: Show correct answer: (B.) Multiple choice question
Step 3: Grading
After finishing setting up the core of the assignment, it is possible to add the configurable grading module. Click here to learn more about how this grading module works.
You also have the option to publish the grade as a percentage or as pass/fail.
For further instructions on how to use the interactive presentation interface after it's been published/during the live presentation, another article is available in the help center.